Cron jobs are the silent powerhouses behind server automation, adeptly managing an array of tasks via scripts or programs in versatile languages such as PHP, Python, Node.js, Perl, Ruby, Go, and Swift. These meticulously scheduled commands optimize routine operations directly from the command line, boosting system performance and elevating the user experience with seamless precision and professionalism.
Here’s a deeper look at their applications:
- Log Management: By automating the deletion of old log files, cron jobs help maintain the system’s performance and prevent the server from being overwhelmed by too much data, which can slow down processes and increase retrieval times.
- Email Notifications: Cron jobs can be programmed to automatically send email alerts to users about their usage against set resource limits. This proactive communication helps users manage their account settings effectively, avoiding potential service disruptions or additional charges.
- Software Updates: Regularly scheduled cron jobs can check for new updates and apply them automatically. This not only keeps the software secure from vulnerabilities but also ensures that the latest features are always available, reducing manual oversight and maintenance.
- Data Backups: Automating data backups through cron jobs ensures that copies of vital website files and databases are regularly created and stored safely. This is crucial for disaster recovery, as it protects against data loss from hardware failures, cyber attacks, or accidental deletions.
Setting Up a Scheduled Task in cPanel
Step1: Accessing your server using the Terminal feature in cPanel:
- Log into cPanel: Use the credentials provided by your web host, typically found in your welcome email.
- Navigate to Terminal: Once logged in, click through the necessary links to access the Terminal interface where you can manage server commands.
Step 2: Access the Cron Jobs Feature
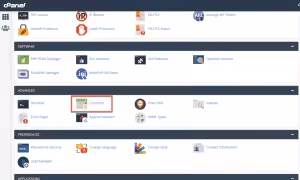
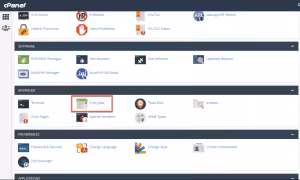
- Navigate to the Advanced Panel: From your cPanel dashboard, locate and select the 'Advanced' panel.
- Open Cron Jobs Configuration: Click on the 'Cron Jobs' icon within the panel to bring up the configuration screen where you can manage and set up your scheduled tasks.
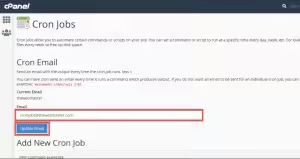
Step 3: Configure Cron Email Notifications
- Set Notification Email: In the Cron Email section, enter a new email address in the Email input box if you want to change where output notifications are sent.
- Update Email Settings: Click the 'Update Email' button to save the new email address.
- Manage Notifications: If you prefer not to receive any notifications, append the following to the end of your cron job command:
/dev/null 2>&1
- Default Email: Without updates, notifications will continue to go to the cPanel’s default email address.
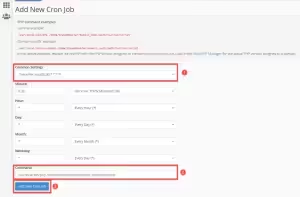
Step 4: Add a New Cron Job
- Navigate to Cron Job Configuration: In your cPanel, find and click on the "Add a New Cron Job" section.
- Choose Execution Frequency:
- Common Settings: Select from predefined intervals like every minute, every 5 minutes, or every 15 minutes. Alternatively, pick specific times within an hour, for instance, at the top of the hour (0) or at minute six (6).
- Detailed Time Settings:
- Minute: Set the minute at which the cron job should run. Use */2 for an interval of every two minutes, or 6 for a specific minute like the 6th minute of the hour.
- Hour: Specify hours of operation, either as a single hour or an interval, such as every 3 hours using */3.
- Day: Designate which days of the month the job should execute, using either specific days (like 15 for the 15th) or an interval (every 2 days with */2).
- Month: Select which months the job should run, either specific months (e.g., 1 for January) or at intervals (every 2 months with */2).
- Weekday: Choose specific weekdays or a range, such as 1-5 for Monday through Friday.
- Command Configuration: Input the exact command to execute. For a PHP script, you might use
/usr/local/bin/php /home/your_username/public_html/path_to_script.php.
Adjust the path based on your server’s configuration and include the specific PHP version if necessary, like
/usr/local/bin/ea-php73 /home/your_username/domain_path/path_to_script.php.
Implement the Cron Job: After thoroughly reviewing all settings for accuracy and necessity, click “Add New Cron Job” to schedule the task.
Note: It’s important to carefully consider the frequency of cron jobs. Scheduling a job too frequently can strain server resources, potentially leading to performance issues. Most hosting environments suggest a minimum interval of 5 to 15 minutes to balance efficiency with system load.
How to Modify an Existing Cron Job
Step 1: Access the Cron Jobs Configuration
To manage your cron jobs, go to the Advanced Panel in cPanel and click on the "Cron Jobs" icon. This will open the configuration screen where you can edit your existing cron jobs.
Step 2: Edit the Desired Cron Job
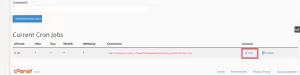
- Navigate to Current Cron Jobs: Scroll down to the "Current Cron Jobs" section in the Cron Jobs configuration screen.
- Select the Job to Edit: Find the cron job you wish to modify and click the "Edit" link next to it. This will allow you to make the necessary changes to the cron job's settings and commands.
Step 3: Make Your Changes
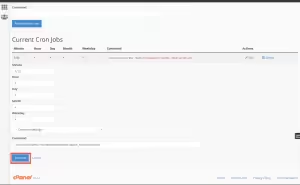
- Edit Cron Job Settings: Adjust any settings as needed for the cron job. You can modify the timing and command details initially set during creation.
- Note on Common Settings: Only the main "Common Settings" dropdown is available for editing. If more detailed adjustments are needed, consider deleting the cron job and creating a new one, or create a dummy cron job to copy settings.
- Save Changes: Once satisfied with your edits, click the "Edit Line" button to save the changes.
How to Verify if a Cron Job is Running in cPanel
Ensuring your cron jobs are running correctly is crucial for maintaining automated tasks. Here are two methods to check if a cron job is running:
Method 1: Checking the Log Files
If you have root access, you can search the cron job logs using the grep command in the terminal. Replace "scriptname.php" with the name of your script:
grep "scriptname.php" /var/log/cron
This command filters the log file to show entries related to your script, indicating when it last ran. For shared hosting users without root access, setting up a dedicated cron job email address to receive notifications can be an alternative, but it may flood your inbox.

Method 2: Adding Output to Your Script
Another way to verify cron job execution is by modifying your script to produce a visible output. For instance, you can add a command to output a message or result when the script runs. This helps confirm the cron job is functioning as expected.
Example: Add a line in your PHP script:
file_put_contents('cron_output.log', 'Cron job executed at ' . date('Y-m-d H:i:s') . "\n", FILE_APPEND);
This code appends a time stamped message to a log file each time the cron job runs, allowing you to track its activity. Always consult with an experienced developer if you’re not familiar with modifying cron scripts to avoid any issues with your website.
- Log Files: Use the grep command to search cron job logs if you have root access.
- Script Output: Modify your script to generate visible output confirming its execution.
Conclusion
Monitoring and verifying cron job execution is essential for the smooth operation of automated tasks. By using log file checks or modifying scripts to produce visible output, you can ensure your cron jobs are functioning correctly. For those using shared hosting without root access, setting up a dedicated email for cron notifications is a practical alternative.
For reliable web hosting solutions that support efficient cron job management and other advanced features, consider exploring Netrouting's web hosting services. Their robust hosting plans ensure your automated tasks run seamlessly, enhancing your website's performance and reliability.
Note: You need to have a good knowledge of Linux commands before you can use cron jobs effectively. Check your script with your hosting administrator before adding a cron job