For those looking to elevate their web security, implementing Two-Factor Authentication (2FA) on your hosting account is a crucial step. This guide has outlined simple yet effective steps to enable 2FA, ensuring an added layer of security by combining something you know (your password) with something you have (a mobile device for authentication). Protect your digital presence effectively, begin by securing your hosting environment today.

Setting Up Two-Factor Authentication (2FA) for Your cPanel

Enhancing the security of your cPanel access is crucial, and implementing Two-Factor Authentication (2FA) adds an essential layer of protection. This straightforward guide will walk you through activating 2FA on your Netrouting cPanel.

Prerequisites

Before you begin, ensure you have a smartphone available, as it’s necessary for generating the verification codes. If you are using VPS or Dedicated servers, remember that 2FA needs to be activated from the WHM first.

Steps to Enable 2FA in cPanel

      1.  Accessing cPanel:

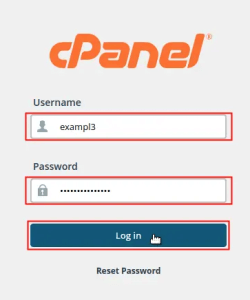
  • Start by logging into your cPanel. Navigate to the login page, where you will enter your username and password.

cPanel login screen with fields for username, password, and a login button.

      2. Locate 2FA Setting:

  • Once logged in, use the search bar at the top of your cPanel dashboard and type in “two” to quickly find the Two-Factor Authentication settings.

cPanel interface showing a search bar with 'two' typed in, highlighting the Two-Factor Authentication option under Security.

     3. Activate 2FA:

  • Click on the Two-Factor Authentication icon, which might be highlighted or marked for easier access in the security section of cPanel.

cPanel interface showing a search bar with 'two' typed in, highlighting the Two-Factor Authentication option under Security.

     4. Configure Your 2FA:

  • Press the ‘Set Up Two-Factor Authentication’ button to begin the configuration. This action will open a new section or menu where you can choose your setup method.

cPanel Two-Factor Authentication setup screen indicating that 2FA is not configured and providing an option to set up Two-Factor Authentication.

      5. Choosing Setup Method:

  • You will have the option to use either the QR Code or Manual Entry for setting up 2FA:
    • QR Code Method: Use your smartphone’s camera to scan the QR Code displayed. This will automatically add your cPanel account to your authentication app.
    • Manual Entry: If you prefer, manually enter the account and key information displayed into your authentication app.

QR Code Method

Step 1:

Scan the QR Code: Start by using your smartphone to scan the QR code shown under the first step of the setup process on your cPanel. Look for the QR code under “Step 1” and ensure it’s clearly visible on your device’s screen.
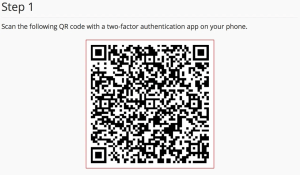
Step 1: Scan the QR code with a two-factor authentication app on your phone.

Note: Once you scan the QR code with your phone, a security code will be automatically generated by your authentication app. This code is required for the next step of the verification process.

Step 2:

  1. Enter the Security Code: Proceed to type this security code into the designated field marked ‘Security Code’ on your cPanel under “Step 2”. Make sure you do this quickly as the code is temporary.
  2. Confirm Setup: After entering the security code, click on the ‘Configure Two-Factor Authentication’ button to finalize the setup.

Note: The security code refreshes every 30 seconds. If not used within this timeframe, a new code will need to be generated and entered to proceed. Ensure you complete these steps promptly to avoid the need for regeneration.
Manual Entry Method

      1. Enter Account Information:

  • On your smartphone, open the manual entry section in your two-factor authentication app.
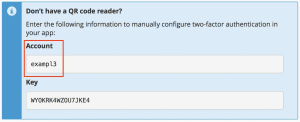
  • Manually input the ‘Account’ details as they appear in the cPanel’s Manual Entry section.

Instructions for manually configuring two-factor authentication with account name and key for users without a QR code reader.

      2. Enter Key Information:

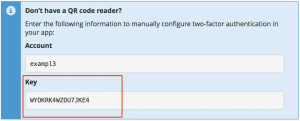
  • Continue by manually inputting the ‘Key’ information, also found in the cPanel’s Manual Entry section.

Instructions for manually configuring two-factor authentication with account name 'exampl3' and key provided for users without a QR code reader.

      3. Security Code Generation:

  • After you have entered the account and key, your app will generate a temporary security code. This code is critical for completing the setup process.

      4. Enter the Security Code:

  • Locate the field labeled ‘Security Code’ under Step 2 in your cPanel setup screen.
  • Enter the generated security code into this field.

      5. Complete the Setup:

  • Press the ‘Configure Two-Factor Authentication’ button to finalize the setup.

Step 2: Enter the security code generated by your two-factor authentication app in the Security Code field and click Configure Two-Factor Authentication.

Note: The security code is only valid for approximately 30 seconds. If it expires before you enter it, your app will generate a new code. You must enter the new code to proceed.

      6. Confirmation:

Once the setup is successfully completed, a confirmation message will be displayed, indicating that two-factor authentication is now enabled for your account. This will require the security code for future logins to cPanel, enhancing your account’s security.

Success-Two-Factor-Authentication-Configured-On-Account

After enabling two-factor authentication (2FA) on this cPanel account, users are required to provide a security code from their smartphone app each time they log in, enhancing account security.

To log into cPanel with 2FA:

  1. Access the cPanel login page and enter your username and password. Click “Login.”
  2. When prompted, open your authentication app on your smartphone to generate a new security code.
  3. Enter this security code in the provided field on the cPanel screen.
  4. Click “Continue” to access your cPanel dashboard.

Note: Your security code is temporary and expires in about 30 seconds. If not used within this timeframe, you’ll need to generate a new code.

To log into cPanel with Two-Factor Authentication (2FA):

       1. Navigate to the cPanel login page and input your username and password, then click the “Login” button.
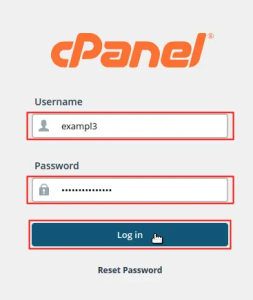
cPanel login screen with fields for username, password, and a login button.

       2. Open the authentication app on your smartphone to generate a new security code.
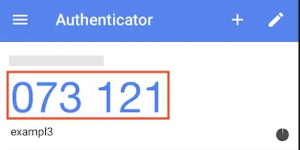
Authenticator app showing a two-factor authentication code for the user 'exampl3'.

       3. Enter the freshly generated security code into the field marked “Enter the security code for {your user}” and press the “Continue” button.
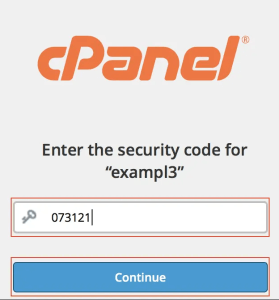
cPanel screen prompting the user 'exampl3' to enter the security code generated by the two-factor authentication app.

Note: Each security code expires after 30 seconds. If not used within this time, a new code will need to be generated.

Embracing the right security measures for your digital platforms is crucial. Through detailed tutorials like the one on Two-Factor Authentication, we aim to fortify your experience in managing your digital assets effectively and securely. For those looking to elevate their online presence, consider exploring hosting solutions that integrate advanced security protocols with high-performance capabilities to ensure both efficiency and safety.

If you’re keen on a seamless, optimized web hosting experience that aligns with the security measures you value, I invite you to learn more about our offerings. Delve into the variety of options that cater to diverse needs, from startups to established enterprises, by visiting our web hosting solutions page. Your next step in securing and enhancing your online presence is just a click away. Visit Netrouting Web Hosting for more details.

Need help?

Find answers quick, talk to us on live chat.

Start Live Chat
support-chat-bottom
Phone
+31(0)88-045-4600
+1-305-705-6983