
The remote console puts your machine's screen and keyboard in a browser tab. You reach for it when SSH won't help: a server hanging at boot, a firewall rule that locked you out, a kernel panic, an expired Windows login. The machine itself doesn't need to be running anything.
You have two ways in:
- Remote console: a browser-based console that we run for you, on bare metal and cloud alike. It's one click and there are no credentials to look after. Try this first.
- Management interface access (bare metal only): temporary access, locked to your address, to the server's own management controller (IPMI or BMC), with a throwaway login. Use it for hardware the console can't drive, or when you need everything the controller can do, mounting an installer image over the network for example.
The one thing that trips people up: a bare-metal console or management session lets in exactly one public IP address, the one you enter when you open it. Connect from that same connection. If a VPN switched on in the meantime, if you're on a phone using mobile data, or if your office goes out through a different address, you'll get a refused connection and no error message to explain it.
Method 1: In the portal
Bare-metal servers: the remote console
- Log in at amoni.app, open Servers and click the server.
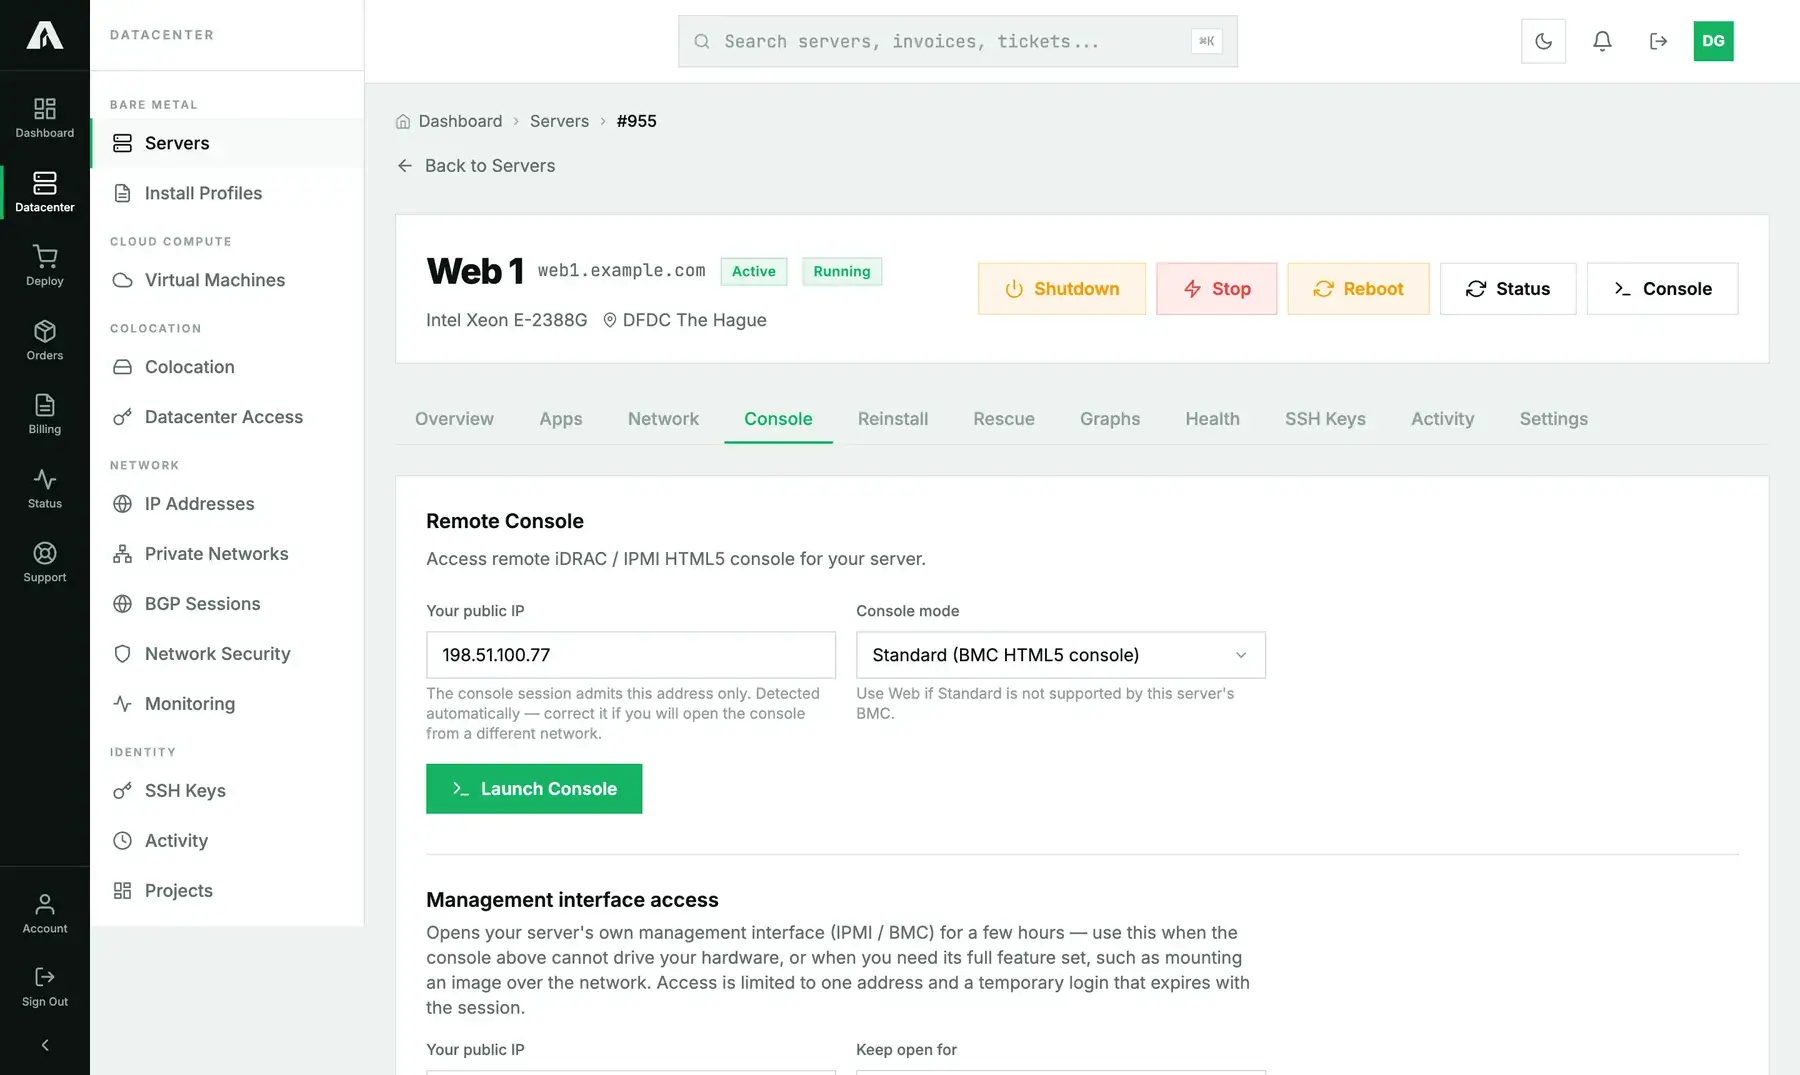
- Click Console in the header or open the Console tab. Both lead to the same panel.
- Your public IP is pre-filled with the address you're browsing from. Check it. If you'll be opening the console from another network, or a VPN is about to come up, fix it now.
- Leave Console mode on Standard. Only switch to Web if Standard turns out not to work with this server's controller. The troubleshooting section tells you how to spot that.
- Click Launch Console. The session takes a few seconds to prepare.
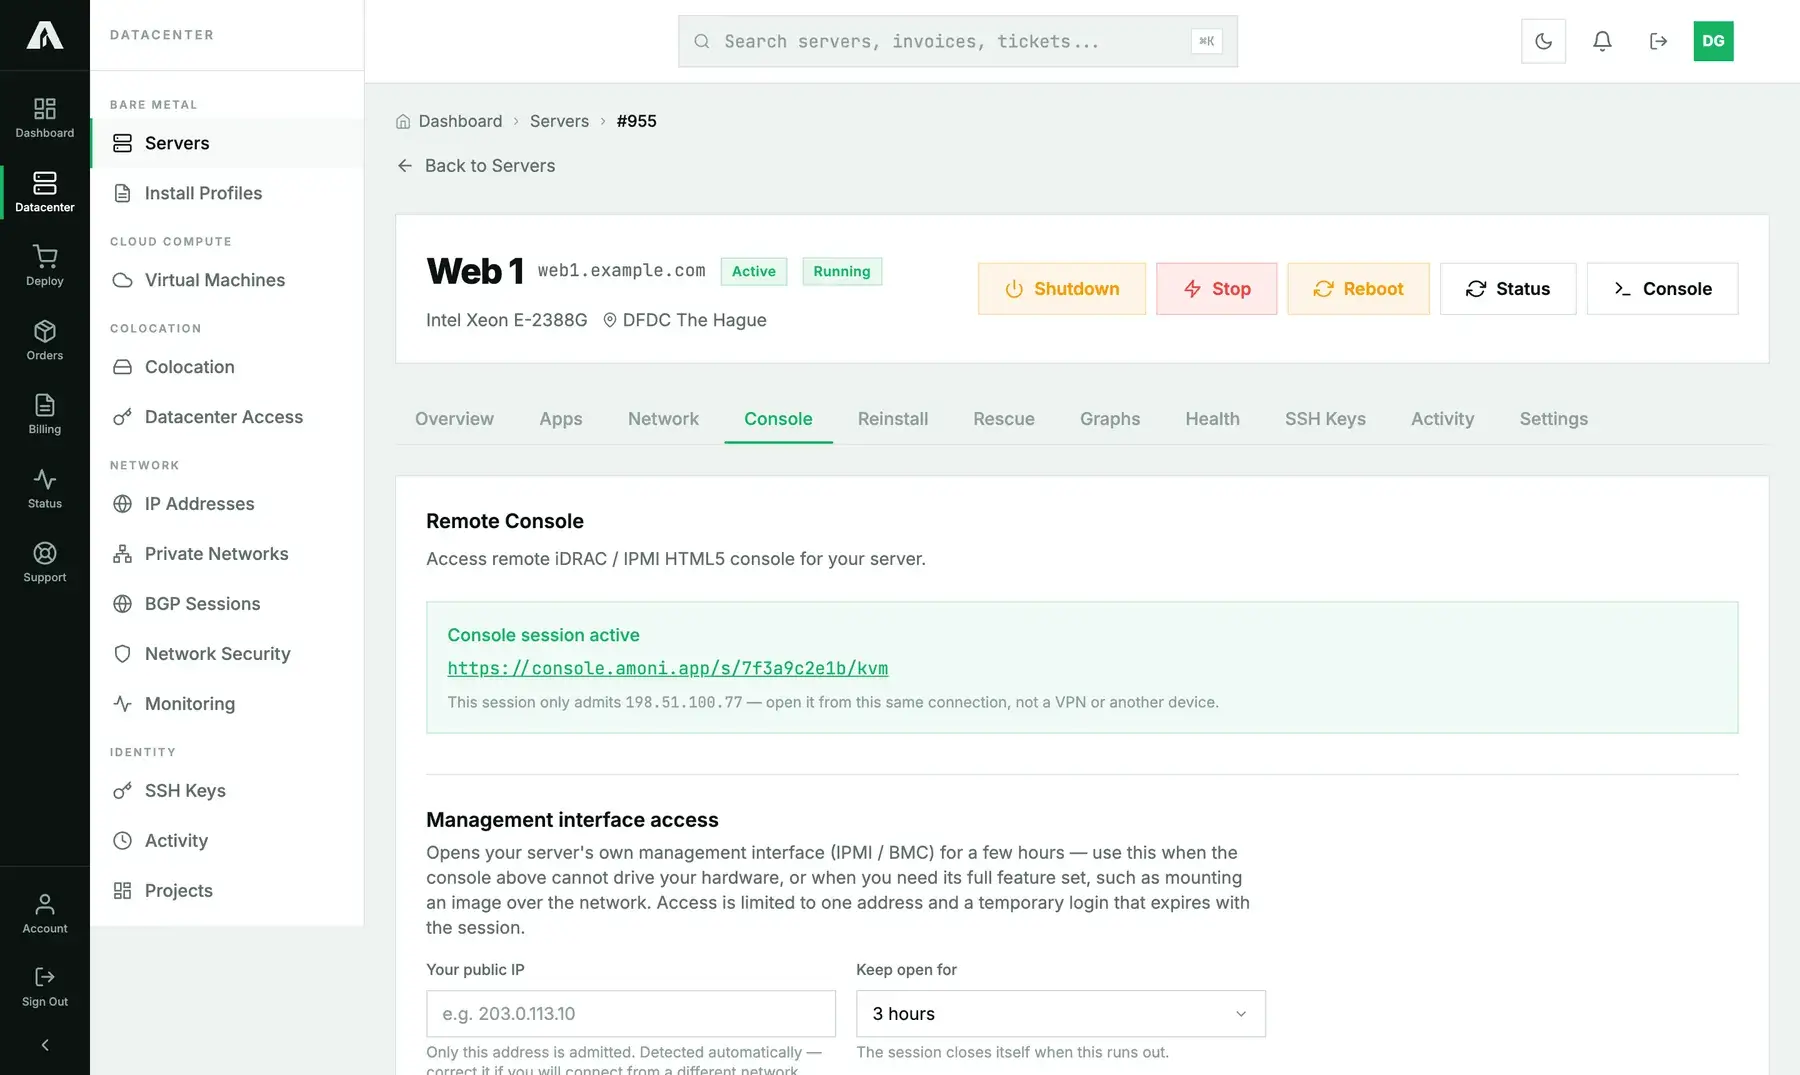
- When the panel turns green and shows Console session active with a link, click the link and the console opens in a new tab. The line below it repeats which address the session lets in.
What opens is a Server Console page, with the server's name and a Connected badge in the header, a CTRL + ALT + DEL button and the machine's screen from power-on onward, BIOS and boot loader included. On most of our hardware, that screen is the controller's own viewer running inside the page, and its menu bar (Virtual Media, Macro, Power Control and so on) runs along the top of the window. The small toolbar on the left is part of the page, not the viewer: keyboard, clipboard, full screen, settings, disconnect.
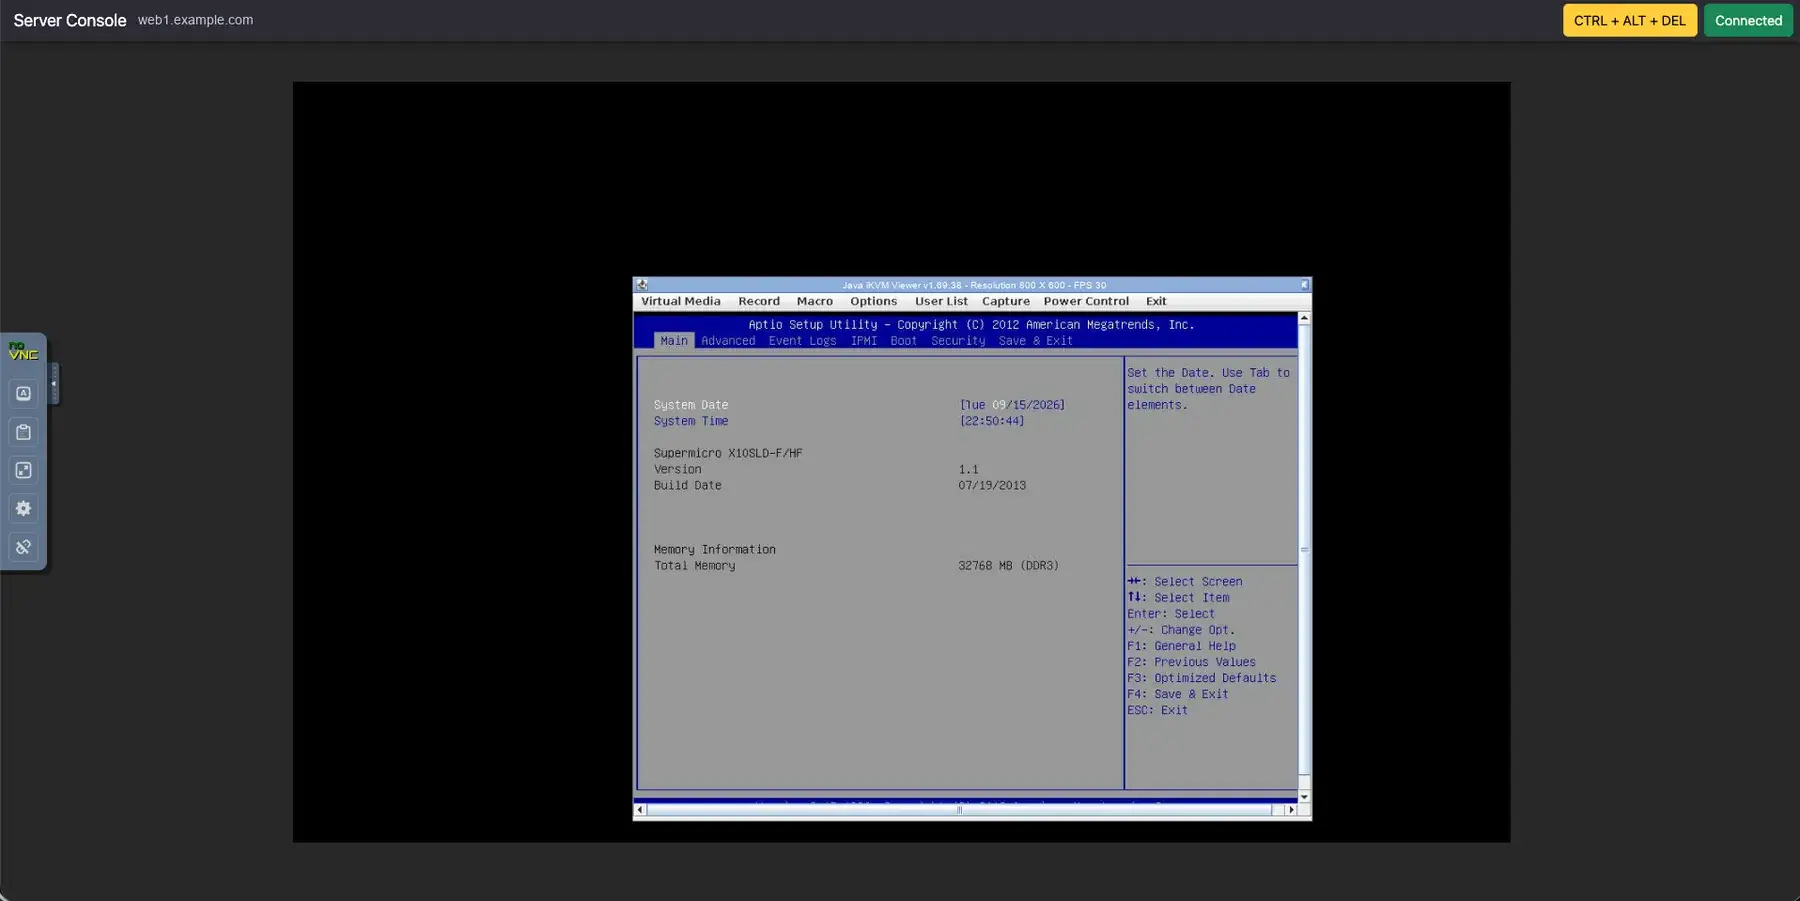
A black screen usually means the server is powered off. Use Start in the portal header (see reboot and power) or the viewer's own Power Control menu.
Boot from an installer or rescue image (virtual media)
The console can hand the server an image from our library as though someone had plugged in a USB drive or a DVD. Use it to run an installer we don't offer as an automated reinstall, to boot a live system and repair or copy data, or to run a vendor utility. The state of the installed system doesn't matter.
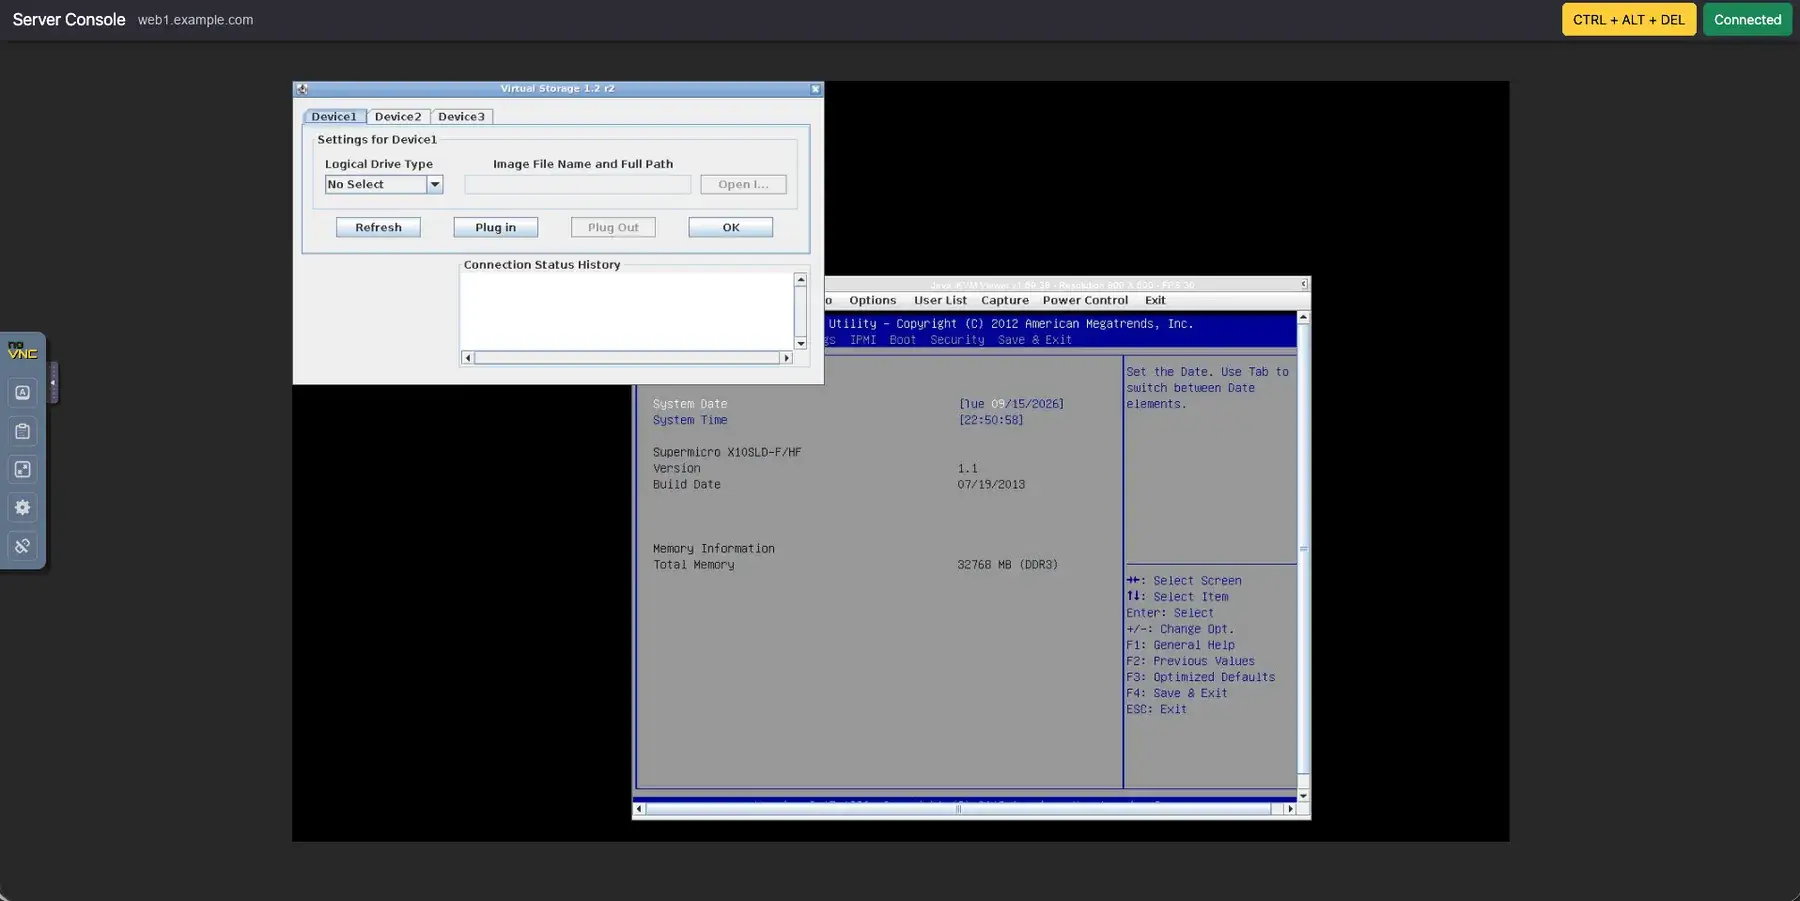
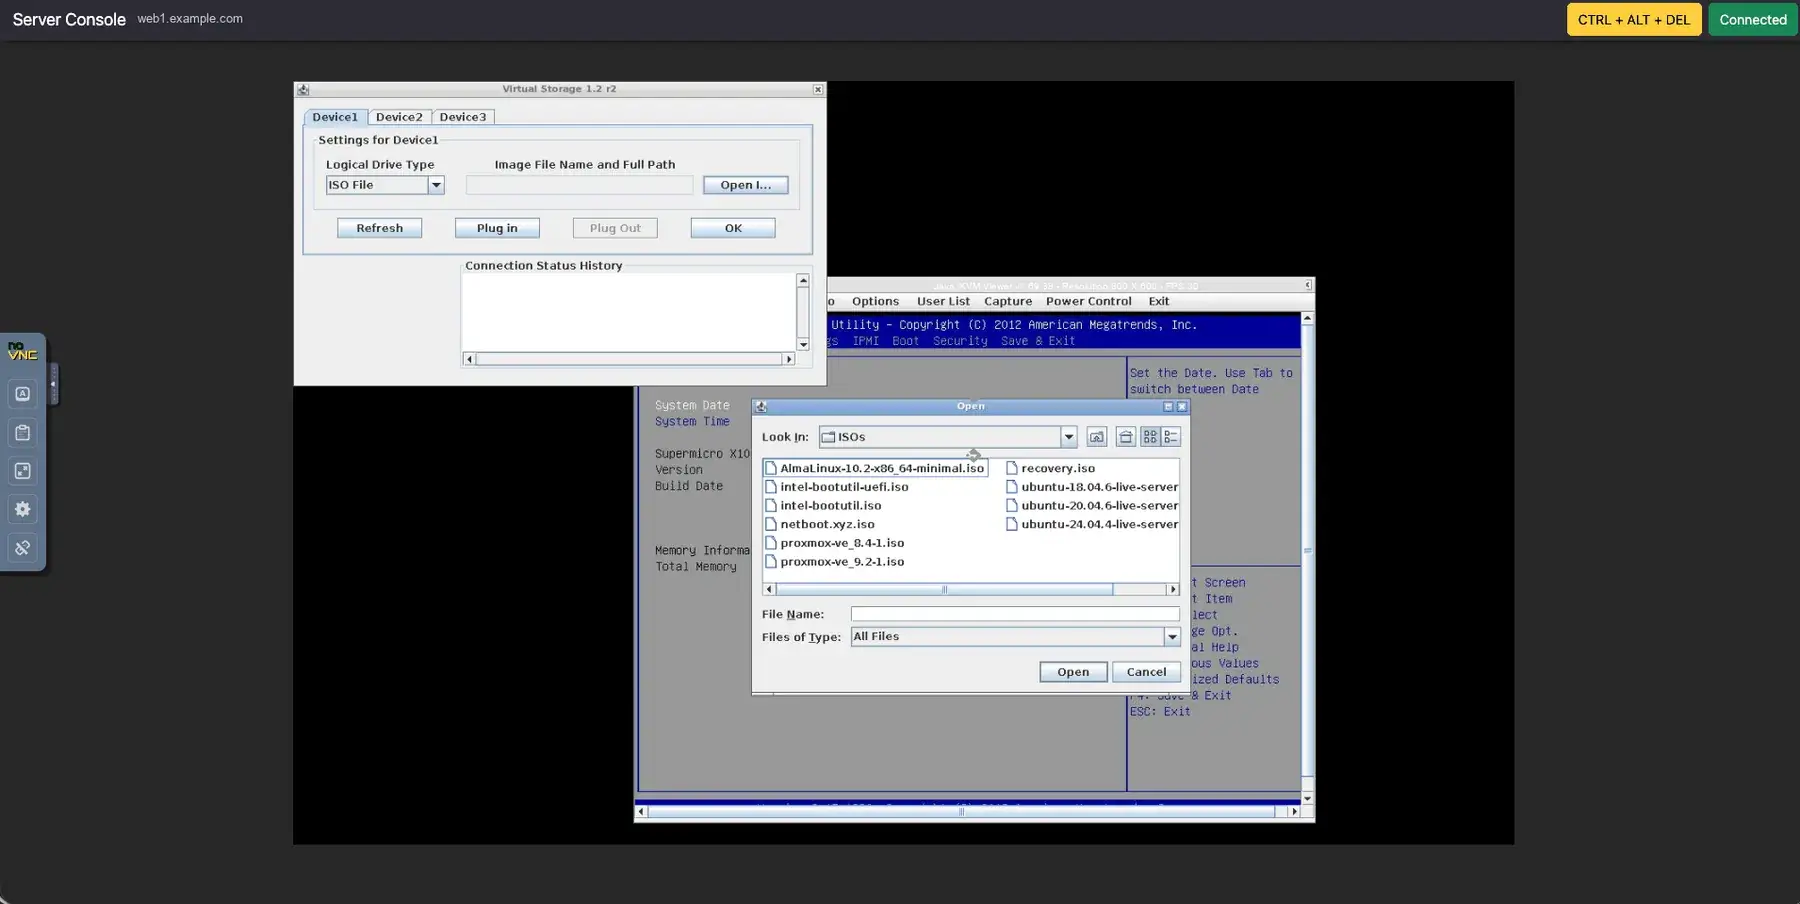
- In the viewer's menu bar, open Virtual Media → Virtual Storage.
- On the Device1 tab, set Logical Drive Type to ISO File and click Open Image.
- Choose an image from the library. You'll find current installers (AlmaLinux, Ubuntu Server, Proxmox VE), a recovery image, netboot.xyz for anything else that boots over the network, and vendor tools like the Intel network boot utility. Click Open.
- Click Plug in, then OK. The image is attached now, and the server sees it as a new removable drive.
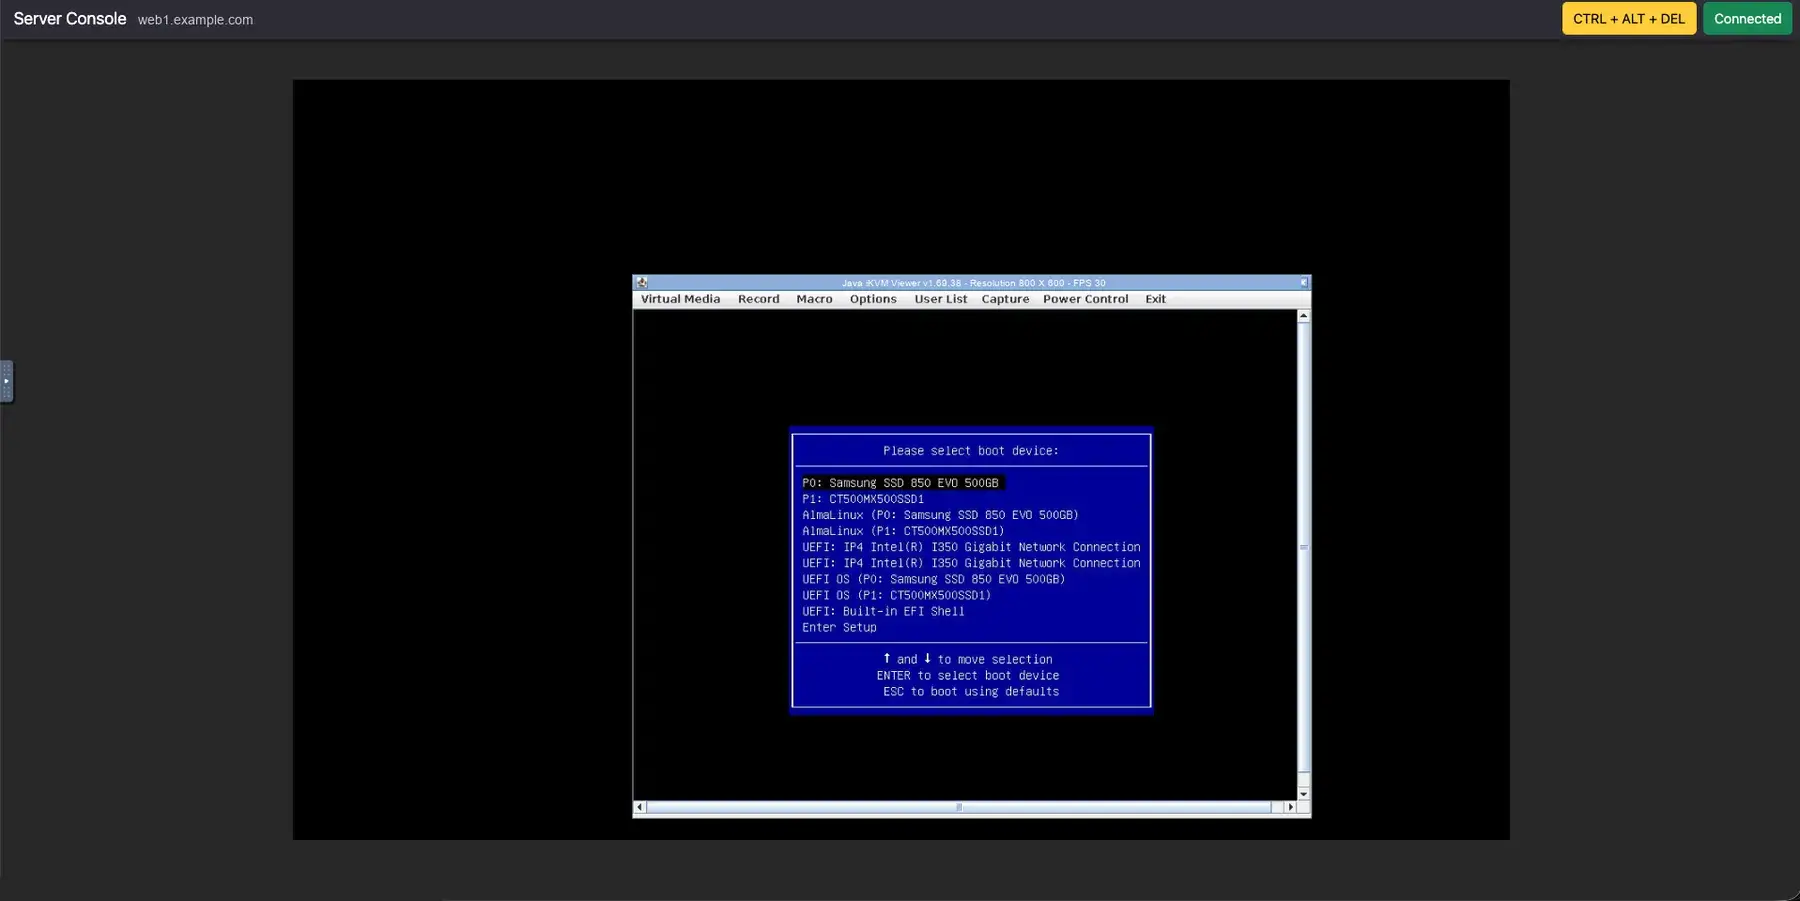
- Reboot the server (viewer Power Control → Reset, or Reboot in the portal), then open the one-time boot menu during power-on. That's F11 on most of our machines. Pick the virtual drive from the list. It shows up as a USB or CD-ROM entry next to the installed disks and the network boot entries.
- Once you're finished, go back to Virtual Storage and click Plug Out. Otherwise the next reboot won't go back to the disk.
An operating system installed this way is a manual install. Nothing sets the hostname, keys or reverse DNS for you, and the portal won't know which OS is on the machine until you tell it. If your image is one we support, the automated reinstall is quicker and keeps a record of everything.
Bare-metal servers: management interface access
This sits further down the same tab. Only use it if the console above doesn't work with your hardware, or if you need the controller's own interface.
- Check Your public IP. The same rule applies as above.
- Choose Keep open for, anywhere from one to four hours. When the time's up, the session closes on its own.
- Click Open management access.
- The panel shows Access is open with a link to the management interface, a username, and a “view it once” link for the password. Open that link right away and copy the password. You only see it once, and it expires with the session.
- When you're done, click Close access now instead of waiting for it to expire.
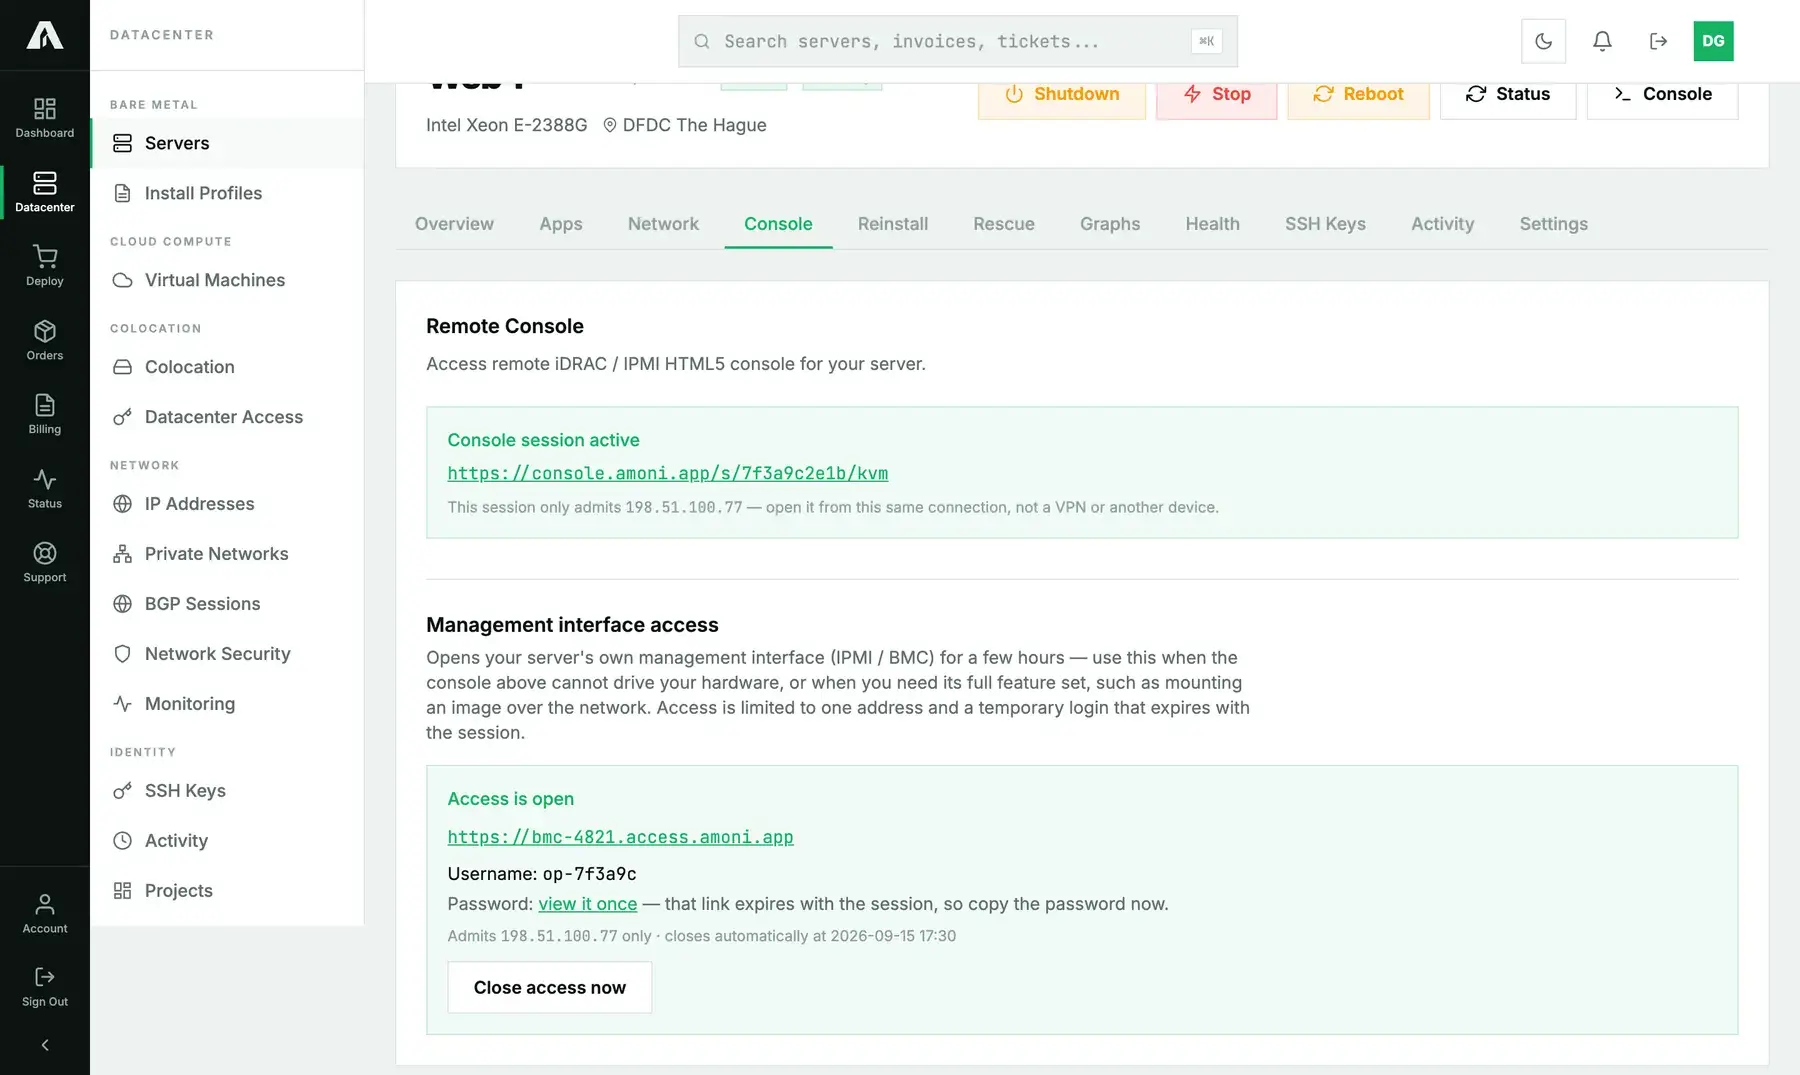
You log in with a temporary operator account made just for this session. It's never the controller's administrator, and it's gone as soon as the session closes.
Cloud instances
- Go to Virtual Machines and click the instance.
- Click Console in the header. It works in every power state, stopped included, since a VM that won't boot is exactly the one you need it for.
- A new tab opens with the console. Its link works once and is valid for one minute, so if a pop-up blocker stopped the tab, allow pop-ups for amoni.app and click Console again.
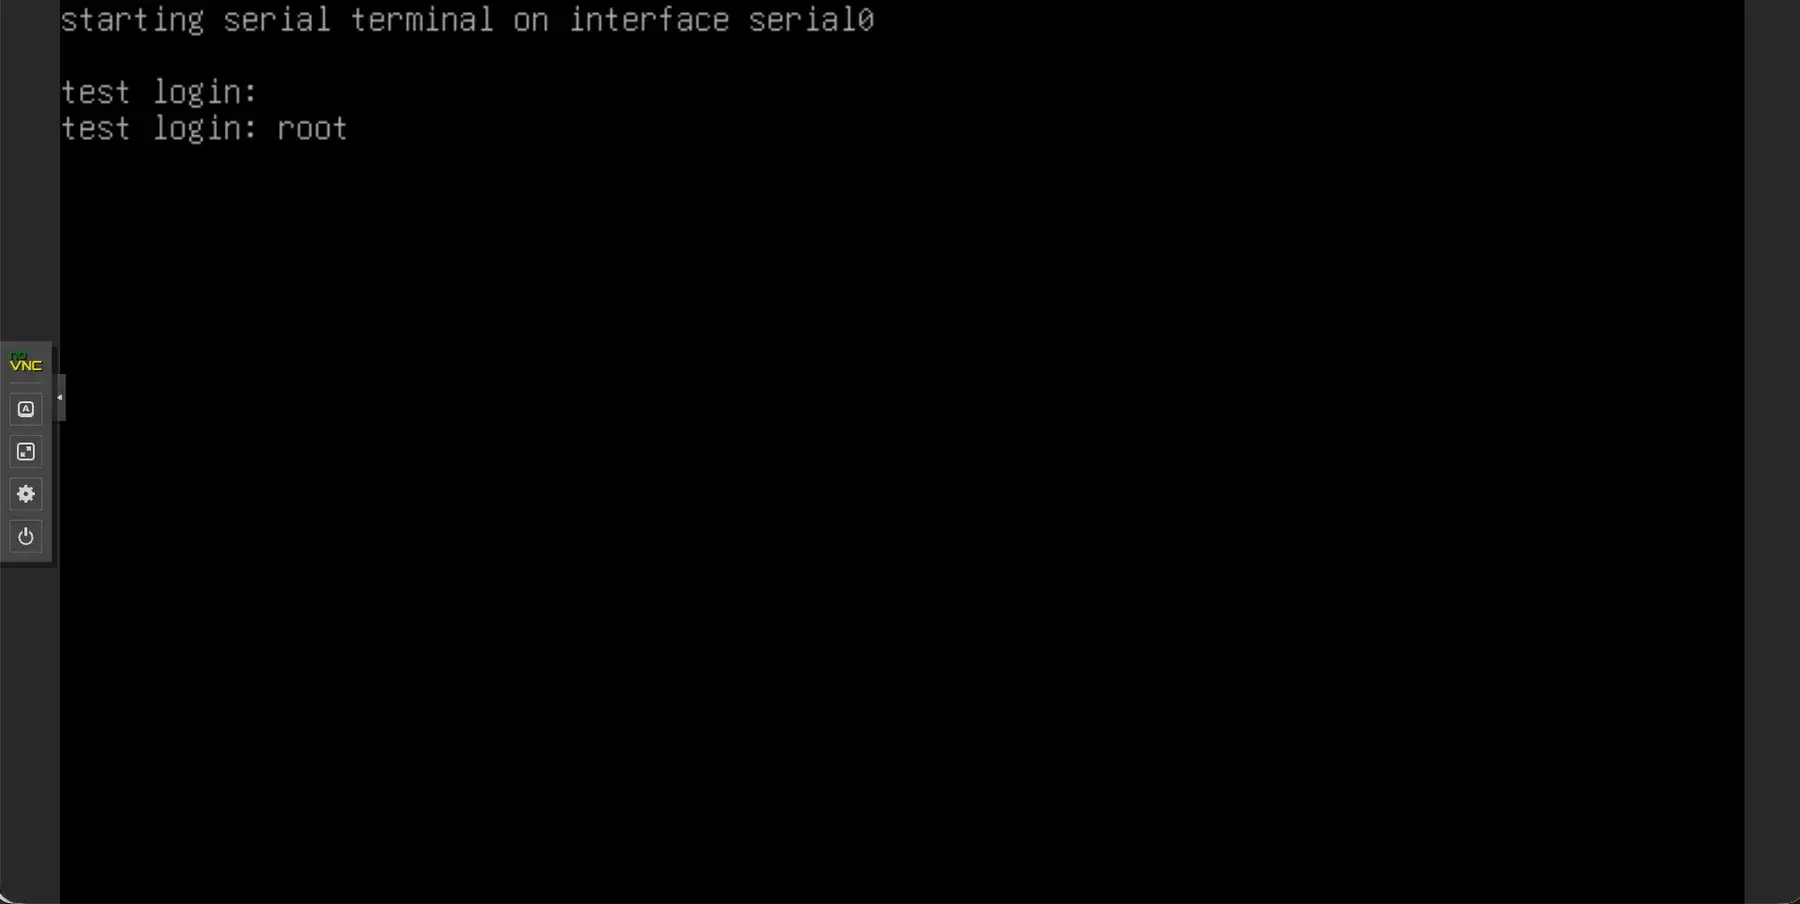
Cloud consoles aren't locked to an address. The single-use link is what protects them. You're looking at the instance's serial terminal, which is text only, and that's why a Linux instance gives you a login prompt instead of a desktop. Log in with the root password (see reset the root password if you don't have it). Booting images works differently on cloud instances, and we'll document that flow separately once it's in the portal.
Method 2: With the API
Console sessions are made for a browser, so all the API does is hand you a launch URL, which you then open wherever you're sitting. Your key needs the Servers scope (servers.write) or the VMs scope (vms.write). Reference: api.amoni.app/v1/docs.
Bare metal: remote console
Pass in the public address that will open the console. The API can't work it out for you, because the machine making the API call is rarely the one with the browser.
MY_IP=$(curl -s https://api.ipify.org)
curl -s "https://api.amoni.app/v1/servers/955/console?authorized_ip=$MY_IP&mode=standard" \
  -H "Authorization: Bearer nr_live_..."
{
"success": true,
"data": {
"available": true,
"console_url": "https://console.amoni.app/s/7f3a9c2e1b/kvm",
"mode": "standard",
"authorized_ip": "198.51.100.77"
}
}Open console_url in a browser on 198.51.100.77. For mode, use standard (default) or web.
Bare metal: management interface access
curl -s -X POST https://api.amoni.app/v1/servers/955/bmc-access \
  -H "Authorization: Bearer nr_live_..." \
  -H "Content-Type: application/json" \
  -d '{"authorized_ip": "198.51.100.77", "hours": 2}'
{
"success": true,
"data": {
"url": "https://bmc-4821.access.amoni.app",
"expires_at": "2026-09-15 17:30",
"authorized_ip": "198.51.100.77",
"operator_user": "op-7f3a9c",
"credentials_url": "https://amoni.app/secret/9Qk2mX"
}
}hours takes 1 to 4, with 3 as the default. The password is not in the response. Instead, credentials_url shows it once and then expires with the session, so fetch it immediately and put it somewhere safe. When you're finished, close the session:
curl -s -X DELETE https://api.amoni.app/v1/servers/955/bmc-access \
  -H "Authorization: Bearer nr_live_..."
{ "success": true, "data": { "message": "Remote access closed." } }Closing a session that isn't open doesn't count as an error. You'll just get the message “No remote access session to close.”
Cloud instances
curl -s -X POST https://api.amoni.app/v1/vms/990204/411/console \
  -H "Authorization: Bearer nr_live_..."
{ "success": true, "data": { "launch_url": "/api/v2/portal/pve-launch/Xk29...a1" } }The launch URL is relative to the portal, so open https://amoni.app + launch_url. It works once and expires after 60 seconds. Mint it when you're ready to click, and not a moment earlier.
What the API will tell you
| Status | code |
Meaning |
|---|---|---|
| 200 | none | Session minted. |
| 401 | invalid_api_key |
The key is wrong, has expired or was revoked. |
| 403 | insufficient_scope |
The key doesn't have servers.write or vms.write. |
| 404 | none | Your account has no server or VM with that id. Body: {"success": false, "error": "Not found"}. |
| 422 | none | authorized_ip missing or not an IP address, or hours out of range (framework shape: {"message": "The authorized ip field is required.", "errors": {…}}); no remote console registered for the server; or management access could not be set up (“Remote access could not be set up right now. Please contact support.”). |
| 503 | none | Cloud: console access hasn't been enabled for this VM yet. Open a ticket. |
| 500 | none | The console platform didn't respond: “The action could not be completed right now. Please try again shortly or contact support.” Try again in a moment. |
Troubleshooting
- The console link opens to a refused connection or a blank page. You're connecting from an address the session doesn't let in. Usually a VPN came up, you moved from Wi-Fi to mobile data, or your network goes out through several addresses. Check your current address (at api.ipify.org, for example) and launch a new session with that one.
- Black screen in the console. Either the server is off or it's in the first few seconds of POST. Look at the Running / Stopped badge, click Start if you need to, and give it a moment.
- The console opens but shows no video, or the keyboard does not respond. This controller doesn't support the standard console path. Launch again with Console mode: Web, and if that fails too, fall back to management interface access.
- “A remote console is not available for this server.” The browser console isn't registered for this server. Management interface access still works. If that's missing as well, open a ticket.
- I closed the password link without copying it. We only show the password once. Close the session with Close access now and open another, and you'll get a fresh login.
- Key combinations go to my own computer. For Ctrl+Alt+Del and the function keys, use the console's virtual keyboard or its send-keys menu.
- Windows says the account is locked or the password expired. The console gets you as far as the login screen. For the fix itself, see Windows account locked.
- It boots to an error I cannot fix from the console. Rescue mode boots a live system you can use to repair disks, boot loaders and configuration.
Still stuck?
Open a support ticket from the portal with the server selected in the “related server” field. Include the address you launched the console for and the time you did it. We can see the session from our side.